29 May 2024

Generate an Invoice Number in Koha automatically


Generate an Invoice Number in Koha automatically

Change some of the below table Settings.

Go to: Home/Administration/Global system preferences (Search on "AutoCreditNumber")


Change to (Automatically generate credit number in the form <year> - 0001)


Save all accounting preferences.  

Above the "AutoCredits Number" same option click on the below "Configure credit types". and
Search on "Payment" and Change to credit number enabled option No to Yes.

Go to: Home/Koha administration/ Additional fields/Table settings/Patrons


Check and uncheck the credit number.
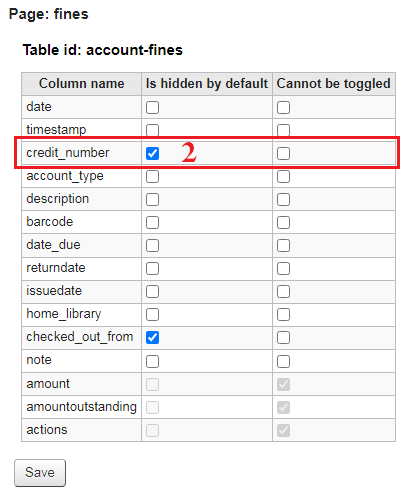
Uncheck the credit number.

After you pay the payment amount, you will see the accounting transaction receipt number details and email receipt which will contain the receipt number.

Accounting Transaction.


Email Receipt


Configure gmail with postfix to send notices from Koha 20.5


1. Installation of postfix mail server

Open a terminal and apply the following commands one by one,

sudo apt-get update
sudo apt-get install postfix
Postfix Configuration ( OK )
No Configuration ( Select and OK)


2. Copy the configuration file.

sudo cp /usr/share/postfix/main.cf.debian /etc/postfix/main.cf

3. Install following packages too

sudo apt-get install libsasl2-2
sudo apt-get install libsasl2-modules
sudo apt-get install ca-certificates

4. Open the following file and add few lines.

sudo leafpad /etc/postfix/main.cf


Add the following lines at the bottom of the file.


relayhost = [smtp.gmail.com]:587
smtp_sasl_auth_enable = yes
smtp_sasl_password_maps = hash:/etc/postfix/sasl_passwd
smtp_sasl_security_options = noanonymous
smtp_tls_CAfile = /etc/postfix/cacert.pem
smtp_use_tls = yes

5.Open the following file.

sudo leafpad /etc/postfix/sasl_passwd

Add the following line in the opened file.

[smtp.gmail.com]:587    urgmailid@gmail.com:yourpassword

Add your Gmail username and password.

6. Change the permission of the following file.

sudo chmod 400 /etc/postfix/sasl_passwd
sudo postmap /etc/postfix/sasl_passwd
sudo postalias hash:/etc/aliases

7.Create the /etc/postfix/cacert.pem. ( Ubuntu 18.04 LTS Users)

sudo cat /etc/ssl/certs/thawte_Primary_Root_CA.pem >> /etc/postfix/cacert.pem

For Ubuntu 20.04 LTS Users

sudo cat /etc/ssl/certs/Actalis_Authentication_Root_CA.pem >> /etc/postfix/cacert.pem

8.  Restart Postfix.

sudo /etc/init.d/postfix restart

9. Enable email service in Koha

sudo koha-email-enable library
Rephrase with Ginger (Ctrl+Alt+E)

Koha Backup | How to Setup Automatic Backup in Koha

 Koha Backup | How to Setup Automatic Backup in Koha

Create Shell Scripts for Daily Koha Backup

To set up Automatic Daily Koha Backup, Follow the below Commands.

First of all, Login to the root user and create directory for backup.

sudo su
Enter Login password when prompted.

Next, Create Koha Backup directory

mkdir koha_backup

Allow write permission to this folder

sudo chmod 777 koha_backup

(Now, Exit from root directory)

Create a backup file.

sudo gedit koha_backup/backup.sh

Copy below text into file and save it.

#!/bin/bash
mysqldump -u[username] -p[password] koha_library | xz > koha_backup/koha_library-$(date +%d-%m-%Y-%H.%M).sql.xz

(Change [username] & [password] as per your Koha Database Credentials)

 Make this file executable by running the following command

sudo chmod +x koha_backup/backup.sh

Execute the file to take backup.

Ubuntu machine for Koha installation

Install Ubuntu LTS

Koha officially supports Ubuntu LTS. Download Ubuntu-LTS-desktop(amd64 bit) from the following link,

Ubuntu Desktop 24.04 LTS

Burn the Ubuntu LTS OS image to a Pen Drive/CD/DVD. Insert the medium, change the computer's boot option and start the Ubuntu installation process. Visit the link to familiarize yourself with the Ubuntu LTS installation.

Open Terminal on your Ubuntu machine for Koha installation.

sudo su

apt-get update

apt-get upgrade

Install mousepad Text Editor

apt-get install mousepad

Add Koha repository

sudo apt install -y software-properties-common dirmngr file-roller 

Add Koha Community Repository & Trusted Repository Key

echo 'deb http://debian.koha-community.org/koha stable main' | sudo tee /etc/apt/sources.list.d/koha.list

wget -O- http://debian.koha-community.org/koha/gpg.asc | sudo apt-key add -

Update Software Repository

apt-get update

Install Koha Software

sudo apt install -y koha-common

Port Configuration

Open following file to change port number.

sudo mousepad /etc/koha/koha-sites.conf

Here I change the port number of the Koha staff client to 8084. Find the following line in the file and make changes.

INTRAPORT="8084"

Install MariaDB Client & Server

We will use MariaDB Client and Server for Koha Database. Execute following commands one by one to 
Install MariaDB Client .

sudo apt install mariadb-client-10.6

Install MariaDB Server.

sudo apt install mariadb-server

Assign Root password for MariaDB

sudo mysqladmin -u root password newpass

[Replace 'newpass']

Koha instance creation

Apply the following commands to create Apache configuration files.

sudo a2enmod rewrite

sudo a2enmod cgi

sudo service apache2 restart

Create a Koha instance with the name library. (Your Library Short Name)

sudo koha-create --create-db library or your choise 

Add new port

We have assigned 8084 port for the Koha staff client and 84 for OPAC.  Open the following file and add the new port, 8084 to Apache.

sudo mousepad /etc/apache2/ports.conf

Copy-paste following line below Listen 84
Listen 8084

Restart Apache,

sudo service apache2 restart

Enable modules and sites

sudo a2dissite 000-default

sudo a2enmod deflate

sudo a2ensite library

sudo service apache2 restart

Run the following command to install “Locale::Language” perl module.

sudo apt install liblocale-codes-perl

Enable & Start Plack for Koha Performance Improvement (Only enable it if you have sufficient RAM):

sudo koha-plack --enable library && sudo koha-plack --start library

Install perl modules koha Supporting

sudo perl -MCPAN -e 'install Bundle::KohaSupport'


Restart Memcached service to open Koha web installer.

sudo service memcached restart

Open the following link in the web browser to open the staff client of Koha and set up the library,

Staff Client
http://127.0.1.1:8084
OPAC
http://127.0.1.1:84
  

Enter into the Koha staff client using the Database username and password of koha_library. It can be found in the file, /etc/koha/sites/library/koha-conf.xml. 

Apply the following file in a terminal.

sudo mousepad /etc/koha/sites/library/koha-conf.xml

Multiple Instances library

Open and edit the apache2 site file and add port numbers
sudo mousepad /etc/apache2/sites-available/library.conf

Setup the library

After the successful installation, need to create initial parameters Visit links (e.g. 

1. Branch,

2. Itemtype,

3. Superuser Creation or super Librarian,

4. Circulation rules,

5. Patron categories,
6. Adding a New Membership,
7. Adding New Books etc...) to start with Koha. We need to open the web interface of Koha and start the configuration of Koha to start.

Installing Multiple Instances of Koha (Koha Multiple Interface /Library)


First install Mousepad (or) Leafpad (Already installed, ignore the command)

Open Terminal and apply the below command (Ctrl + T)

sudo apt-get install mousepad
            (or)
sudo apt-get install leafpad

Add two different port numbers for the new Koha instance

sudo mousepad /etc/apache2/ports.conf

Add two new ports,

Listen 77
Listen 1977

Create new instance

sudo koha-create --create-db instancename

We have created an instance (e.g. lptc) for our Lib Power Tech College.

Open and edit Apache site file and add port numbers

sudo mousepad /etc/apache2/sites-available/lptc.conf


Save and close the file.

Restart Apache server

sudo /etc/init.d/apache2 restart

Open Koha staff client and proceed installation post installation process.

http://127.0.1.1:1977

Zebra rebuild

koha-rebuild-zebra -v -f instancename

Find Koha new instance configuration files in

/etc/koha/sites/ instancename

Customizing Overdue Fine Calculations in Koha: A Detailed Guide

Customizing Overdue Fine Calculations in Koha: A Detailed Guide Customizing Overdue Fine Calculations in Koha: A De...